The Complete {Photo} Guide to Making Your Own
Homemade Laundry Detergent
 Step-by-step-by-step-by-step-by-step....
There have been a lot of questions posted lately about the whole laundry detergent-making process. Which I take as a great sign that more and more people are getting fed up with the ridiculously high-priced brand name stuff and turning to time-tested, "mother-approved" formulations that date back to before most of us were born! :-) And work JUST AS WELL, if not better than the over-priced, over-packaged stuff we are forced to lug home from the store in huge plastic bottles that chances are won't be recycled. *deep breath* (Stepping down off soapbox....for now).
In any case, I thought it might be helpful to post another "update", if you will, on the Homemade Laundry Detergent project with more pictures!
Keep in mind, however, there is no "right" way to make this stuff....this is just the way it works best for me. I would suggest if you want lots more VALUABLE INPUT from other readers....visit one of the following ORIGINAL POSTS and read the comments. GREAT information there!!
Let's start with the basic recipe again:
Many people make this in a big, 5-gallon container, but call me lazy, cuz I don't like to drag in a 5 gallon bucket from the garage. When it's time to make soap, I just pull out my 4-quart saucepan like I'm cooking up a double batch of rice. :-)


I "cook" the soap soup at on medium low until all the little bits of soap are completely melted. To make sure of this...I will let it come to a boil for just a minute. That way I'm pretty sure no pieces of soap will be floating in my finished product.

I then add the 1 cup of Borax and the 1 cup of Washing Soda. Once again, we are only "cooking" it long enough to make sure it is all a combined and smooth texture. I try not to let it actually come to a boil because it will "boil over" very easily! (Not that I would know about that.)
When it's all nice and combined and sorta creamy looking (if kind of reminds me of cooking pudding at this point)...it's time to pour it into your soap containers.


I THINK it ends up being about 4-5 cups in each bottle but I haven't actually measured it. I just keep adding a little to each until they are all at the same level (and the pan is empty.)


They should look SOMETHING like this. But remember...this is not exact science...if they are a little thicker or runnier...don't worry. It will still be a great laundry detergent and as you continue making and using it...you'll figure out just what works for you.

TADA!! You just made your own homemade laundry detergent for PENNIES a load!!!!! Sure it might be a little lumpy...but who really cares?? It works! Pure and simple.


Honestly, I love this stuff. I don't miss the store-bought stuff one bit! Especially since I started using just a tiny bit of fragrance booster in each load. I kind of missed the scent of the old stuff...but I've found most people prefer this unscented version, especially those with sensitivities to that sort of thing.

There you have it. I really don't think I could have taken any MORE pictures of the whole process. I tried to cover every single step. Hopefully this is helpful for those of you who are trying this for the very first time. You "old-timers" shouldn't even be reading this...what are you doing here anyway? Just teasin'. :-) I can't tell you how grateful I am for the "old-timer" comments when people have questions because I can't always keep up AND your answers are usually better anyway!
 Step-by-step-by-step-by-step-by-step....
There have been a lot of questions posted lately about the whole laundry detergent-making process. Which I take as a great sign that more and more people are getting fed up with the ridiculously high-priced brand name stuff and turning to time-tested, "mother-approved" formulations that date back to before most of us were born! :-) And work JUST AS WELL, if not better than the over-priced, over-packaged stuff we are forced to lug home from the store in huge plastic bottles that chances are won't be recycled. *deep breath* (Stepping down off soapbox....for now).
In any case, I thought it might be helpful to post another "update", if you will, on the Homemade Laundry Detergent project with more pictures!
Keep in mind, however, there is no "right" way to make this stuff....this is just the way it works best for me. I would suggest if you want lots more VALUABLE INPUT from other readers....visit one of the following ORIGINAL POSTS and read the comments. GREAT information there!!
My Homemade Laundry Products
Line-Up
Let's start with the basic recipe again:
- 1 bar grated Fels Naptha soap (or whatever soap you like.)
- 1 cup 20 Mule Team Borax
- 1 cup Washing Soda (not BAKING soda)
- water
Many people make this in a big, 5-gallon container, but call me lazy, cuz I don't like to drag in a 5 gallon bucket from the garage. When it's time to make soap, I just pull out my 4-quart saucepan like I'm cooking up a double batch of rice. :-)

First I add the grated bar of soap and add water
to about the halfway mark.

I "cook" the soap soup at on medium low until all the little bits of soap are completely melted. To make sure of this...I will let it come to a boil for just a minute. That way I'm pretty sure no pieces of soap will be floating in my finished product.

I then add the 1 cup of Borax and the 1 cup of Washing Soda. Once again, we are only "cooking" it long enough to make sure it is all a combined and smooth texture. I try not to let it actually come to a boil because it will "boil over" very easily! (Not that I would know about that.)
When it's all nice and combined and sorta creamy looking (if kind of reminds me of cooking pudding at this point)...it's time to pour it into your soap containers.

I use (3) 1 gallon Minute Maid Orange Juice
bottles.

I use a glass measuring cup and scoop the
mixture out of the pan and pour into the bottles.

I THINK it ends up being about 4-5 cups in each bottle but I haven't actually measured it. I just keep adding a little to each until they are all at the same level (and the pan is empty.)

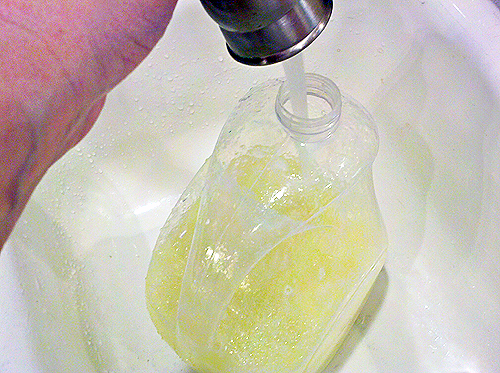
Now I take each one to the sink and hot water
until each bottle is about 1/2 full.

This allows for room to shake the contents after
it hardens AND to add more water to aid in that process.
Then I give each bottle a good shake! Come
on...get your aggressions out! Feel the burn! ;-)

This is what it looks like when I'm done...and
this is the way it will sit overnight.

Then in the morning.....it will look like
this.

Pretty much one big blob of goop. lol.
DON'T BE
ALARMED! DO NOT PANIC! This is perfectly normal!
Everything is going to be OK! I promise.

What *I* do at this point is take a long handled
wooden spoon and break up the goo a little bit
then add more hot water...
....to just a few inches from the top

...and give it another vigorous shake!! Repeat
with other 2 bottles.

They should look SOMETHING like this. But remember...this is not exact science...if they are a little thicker or runnier...don't worry. It will still be a great laundry detergent and as you continue making and using it...you'll figure out just what works for you.

TADA!! You just made your own homemade laundry detergent for PENNIES a load!!!!! Sure it might be a little lumpy...but who really cares?? It works! Pure and simple.


Honestly, I love this stuff. I don't miss the store-bought stuff one bit! Especially since I started using just a tiny bit of fragrance booster in each load. I kind of missed the scent of the old stuff...but I've found most people prefer this unscented version, especially those with sensitivities to that sort of thing.

There you have it. I really don't think I could have taken any MORE pictures of the whole process. I tried to cover every single step. Hopefully this is helpful for those of you who are trying this for the very first time. You "old-timers" shouldn't even be reading this...what are you doing here anyway? Just teasin'. :-) I can't tell you how grateful I am for the "old-timer" comments when people have questions because I can't always keep up AND your answers are usually better anyway!


No comments:
Post a Comment
Note: Only a member of this blog may post a comment.